

How To Install A 30 Amp 2 Pole Breaker
Safe Note: Installing a double pole excursion breaker is not an amateur project. Don't endeavor it if you're not an experienced electrician.
Most home appliances operate at 120 volts, which can exist serviced by a single breaker switch, but some large appliances like car chargers, stoves, and washing machines need 240 volts, which requires combining 2 billow switches into one double pole switch.
Double pole switches flip together if they get tripped. They tin provide ability to ii 120 volt circuits or one 240 volt circuit.
The voltage provided to ability your dwelling house originates at a local transformer, probably housed on a nearby post, where thousands of incoming volts are stepped downward to a more manageable 240 volts. This figure illustrates the secondary winding of a transformer energized with 240 volts between 2 powerlines (A and B).
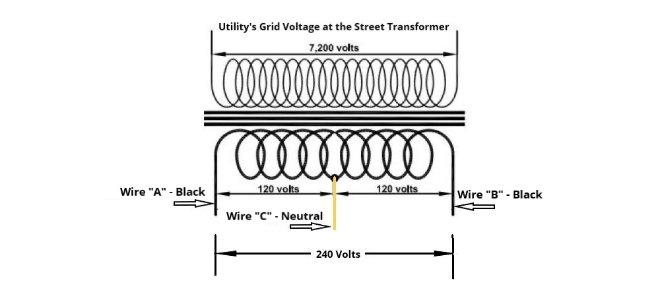
The line identified every bit C is a center tap added to the secondary winding of the transformer that if checked for voltage levels between either A & C or B & C would give you 120 volts reading either way.
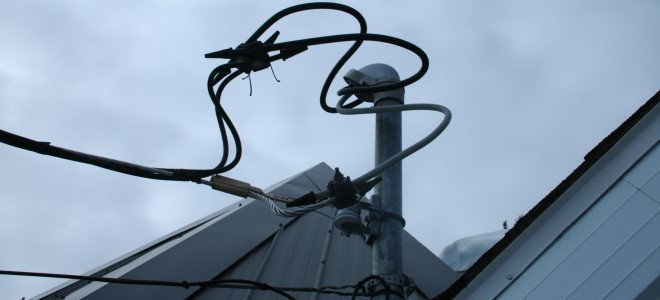
Wires A, B, and C in Figure 1 are the aforementioned wires seen in Figure 2, where the two black wires are continued to the blackness wires coming out at the height of the mast in Effigy 2, and where the Neutral (usually a bare wire) is connected to the white wire at the mast.
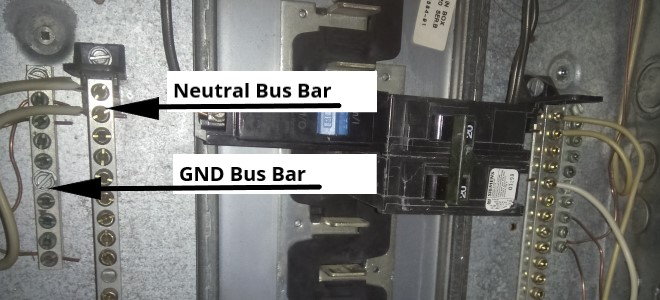
At the other end of the mast, past the electricity meter, inside the electric service panel, the 2 blackness wires hook up to the large double pole service disconnect breaker, commonly referred to as the "Main." The white Neutral hooks up to the Neutral bus confined as shown in Effigy 3.
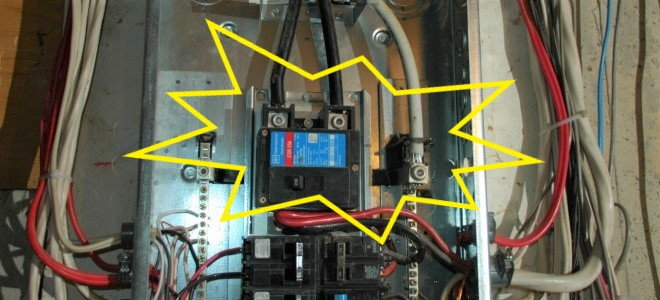
At this point, if you measure the voltage between the 2 black wire terminals at the top of the Main, your reading would still be 240 volts, and 120 volts across the Neutral and each one of the blackness wires known as the Hot lines.
As mentioned earlier, the Main is a double pole breaker, with the other side of each pole connected to their corresponding motorcoach confined that both run vertically at the full height of the panel, where all the breakers from every circuit are connected.
Step 1 - Condom Precautions
1.1 - When or if you're because opening upward the electrical panel, get assist from an experienced electrician if it'south something you lot're non familiar with doing. Working at or altering anything inside the console can be extremely dangerous, then never rely on guesswork. This is non an surface area for trial and error.
one.2 - Before yous start, you must first get a trouble light that is bombardment-powered and securely set up to illuminate your working surface area.
1.3 - If yous're replacing a excursion breaker, brand sure to positively identify the right billow past shutting it off and testing the appliance for power. Mark that billow with tape or a marker of some kind—its tag on the cover will be gone with the encompass removed.
1.4 - Never endeavour to remove the front comprehend of the panel box and expose all its wiring without making sure that the "Main" is turned off, shutting all the lights off around the house. Brand sure all preparations are done before turning it off as the rest of the house will then be in the dark.
Step 2 - What Type of Billow Will You Need?
All service panels are equipped with several bus bars designed to carry a series of wires or circuit breakers. The bars line these breakers up vertically from 1 end to the other—like people sitting in a "double-decker."
Figure 4 shows the ii Hot bus bars, laid flat at the back of the box with a serial of blades bent perpendicular to project outwards and onto which the breakers tin be clamped.
The blades are wide enough that two breakers inserted side-by-side facing each other can hook upwards to the aforementioned blade (same Hot line). Because of the alternate zig-zag design and positioning of the two bus bars, the next bract directly underneath or above gets its voltage from the other Hot line.
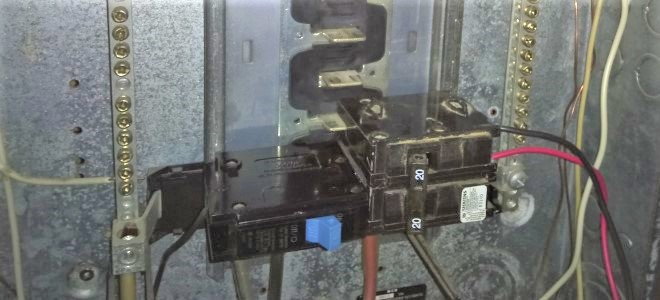
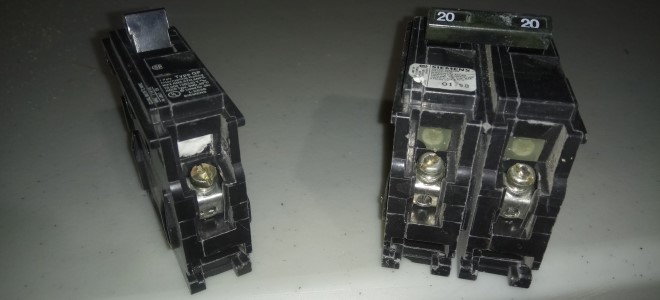
The picture also shows two different breakers—the i on the left is only one-half the thickness and with a smaller toggle lever than the one on the correct with also a much larger lever.
The smaller breaker is called a unmarried-pole breaker considering of its single slot (left breaker in Fig. 5) that can slide and clench itself on a bract, thus borer voltage off one side just of the Hot lines.
This means that once the breaker is turned ON, 120 volts volition flow into the black (or colored) wire secured to the breaker's last (right breaker in Figures five and 6) and leading to the circui t.

But since it needs a render path to the power grid, the white wire from that circuit's cable needs to exist connected to the Neutral double-decker bar inside the panel, thus completing the excursion.
The larger breaker on the right in Figure 4 has two slots that when inserted onto the Hot jitney bars connect to two successive blades of the jitney to provide 240 volts through the billow once activated.
This one is chosen a double-pole circuit breaker and it has ii last screws onto which two colored wires from the circuit's cable—one black and the other usually red—will exist connected (Figures iv and vi).
Footstep three - The Right Brand and the Right Size Circuit Breaker
Electrical panels and their circuit breakers are available from many different manufacturers worldwide. Each 1 has a proprietary system for securing breakers to a bus. So when shopping for breakers, brand sure that you check the make of the panel first and buy the type of billow that will fit within.
Footstep 4 - Decide the Size of the Breaker Needed
If you're installing a double pole circuit breaker, yous must demand 240 volts at an appliance or tool that consumes a lot of power such as a range, a dryer, a hot h2o heater, etc.
The more ability you demand, the larger the wire gauge size you demand, and then check the apparatus's nameplate to find out merely how much amperage it will draw from the power grid. This will determine the size of your circuit breaker.
Pace 5 - The Correct Wire Gauge for the Job
The more than power the appliance is rated for, the larger the approximate size for the wires needs to be. If you're not familiar with wire judge sizes and amperage, you should consult with a reliable electrician to decide for you the size of the cable and figure out whether information technology needs a Neutral wire, as described in Step 6.
Pace half dozen - Make Sure You Use the Proper Cablevision
When wiring a 240 volts circuit, yous must always use the proper cable with at least ii colored wires (one black and 1 another color as well white—usually reddish). A white wire must never be continued to a billow final, simply strictly to the Neutral charabanc instead.
In one case the double-pole breaker is powered-up, the power flows through one of the two colored wires from one concluding, passes through the load, and returns through the other wire to the other terminal, completing the 240 volt circuit back into the grid.
There are some situations, however, where the appliances, such as an electric range, require 240 volts at the elements, but too 120 volts to power the fans, the PC control boards, and the lights.
Appliances such as these need a 3-wires cablevision—as described in Footstep 5—with the white Neutral wire connected to the Neutral charabanc (Effigy 7) and the ii colored wires connected to the two circuit billow terminals within the panel, while at the other cease they will go to a terminal block inside the appliance.
This way, anything connected across the two colored wires will be powered with 240 volts while 120 volts will exist provided to anything connected across the Neutral white and either the blackness or the red terminal spiral.
To stop, don't forget that the GND wires (bare and green wires) ever need to be grounded to GND terminals (Effigy seven) and appliances' chassis.
Footstep 7 - Installing the Circuit Breaker
vii.1 - Once you've determined all the previous steps have been properly followed, plough on the trouble-light and switch off the Main. Then and only and then, yous can remove the forepart cover of the panel.
7.two - If you're replacing a defective breaker, identify which one is busted and remove the 2 colored wires continued to its terminals. You can then pry upward the breaker with a apartment screwdriver, or unscrew it from the panel, depending on the organization used, and set up it bated.
7.3 - Repeating Step 7.2 in contrary order, install the new excursion breaker in place, making sure it's properly secured, then connect the two colored wires to its terminals. Supervene upon the front end cover and secure information technology in place.
seven.4 - One time the cover is back on, switch every one of the breakers off inside the console to foreclose a power surge from everything going on at once. You tin now turn the Principal back on, then all the other breakers, one at a time. Go dorsum to the appliance to come across if it's working.

Source: https://www.doityourself.com/stry/how-to-install-a-double-pole-circuit-breaker
Posted by: pinkstonsomight80.blogspot.com
0 Response to "How To Install A 30 Amp 2 Pole Breaker"
Post a Comment